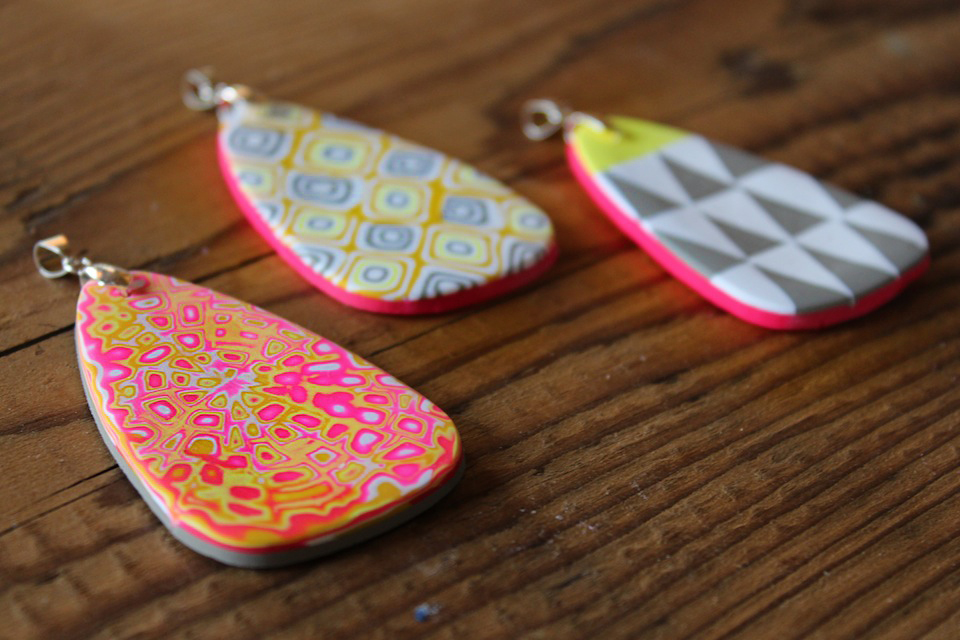
DIY West Elm Inspired Pendant

Hi Tricia!
Just so you know, this page is only visible to you and Erin 
For our DIY Project I’d love to make ONE of these pendants (unfortunately making all 3 would require a full-day for beginner-level students).
So, I’d love for you and Erin to decide which of these 3 pendants you’d like me to teach our guests 
Below I describe 4 critical aspects for us to be aware of about any of these 3 DIY project:
1. WHY (why did I choose these pendants and not other jewelry DIY projects):
This is a brand-new design that I came up with this week specifically to accommodate the limitations we have in terms of time and the event’s “fee”, while making sure that we make something inspired by West Elm products. Just so you know the biggest challenge with polymer clay jewelry making is that it requires lots of tools and materials that are not just pricey (pasta machine is $75-$100) and/or handmade by myself , but also large, heavy and bulky. So, this design was made specifically to require tools that are small, light and as inexpensive as possible, and where the full project could be completed within a much shorter period of time .
NOTE: There are many other projects that are much, much simpler. Unfortunately they are way too easy (and don’t take more than 5 to 10 minutes to complete); so much so that I our guests are likely to be disappointed. Also, it wouldn’t be reflective of the “West Elm Inspired” theme we want to keep, nor is it reflective of my brand.

2. TIME (how long will the class take):
Approximately a little over 2 hours.
The class will consist of:
- Part 1: Creating the bead “pattern” –> Demo followed by execution (with my help).
- Part 2: Adding the “back” of the bead –> Demo followed by execution (with my help).
- Part 3: Baking the bead (toaster oven), and finishing it.
NOTE: The only difference between our 3 pendants is “Part 1”. Making the pattern for “Pendant #2” takes slightly more time than Pendant #1 and #3. (See the very first picture to see which is pendant #1, 2 and 3).
3. MATERIALS & BUDGET (Which determines the “Event Fee”):

A) Materials and tools to be purchased (and prepared by me) in advance for each guest (Right side of the image):
Total Approximate dollar amount per guest to cover tools and materials: $45.
These materials and tools are shown on the RIGHT side of the image (above). Each item that is numbered (in the image) is described below in case you’re curious about what they are and how much they cost (approximately with shipping included).
- 1) Plastic Laminated Placemat: None-stick work surface. $4/each per guest. Not very pretty, but absolutely necessary.
- 2) 5 pieces of polymer clay (in white, grey, yellow, hot pink): Each guest will get their polymer clay pre-massaged, softened and perfectly flattened to begin our project. This saves us 45 minutes!. $15/per guest
- 3) One flexible razor blade. $3/each per guest.
- 4) 2 pieces of sanding paper: 3M 80 grid, 400 grid. $8/per guest
- 5) 4 Pieces of baking paper: $1/per guest
- 6) 1 Acrylic Roller: $8/per guest
- 7) Burnishing square: $2/per guest
- 8) Silver Finishing Detail: $3/per guest.
B) Materials and tools that I will bring, to be shared by our guest: The LEFT side of the image (above) shows some (but not all) of the tools that I will bring and share with our guests. Unfortunately I have only one sample of each, so there will be a little bit of waiting around while our guest share these tools to complete some of the steps (fortunately each step with these tools is fairly quick).
Note: I will bring a small toaster oven, which needs to be plugged somewhat close to our working area. If you can also improvise an additional toaster-oven, I’m sure we’ll eliminate the possibility of taking longer to complete the pendant due to the “baking” part of the project.
4. SPACE (and logistics)
- For my demo: A table with enough space to place all my tools and materials.
- For guests: A couple of tables (with chairs) with enough space for their tools and materials.
- For my West Elm Inspired Jewelry Collection: An additional table (or several smaller tables/ coffee tables), to showcase our “WEST ELM COLLECTION“, which consists of approximately 15 necklaces that will be displayed.
Note #1: Our placemat should protect the table from getting dirty, but it’s inevitable that some clay will stick on the table. Feel free to take any additional measures to protect your tables if needed
Note #2: Normally it works best when the DEMO part of the class takes place only at my table, with our guest surrounding my table to have a close-look and ask questions, before sitting at their table to do the work.
I’m very excited! Let me know if you have any questions!
With warmth,
– Veruschka
